Spa Francorchamps tips & tricks

Spa Francorchamps photo tips Probably the most beautiful and spectacular track in Europe, and in my opinion in the world. […]

After the renovation of the circuit, Zandvoort has become a drama for amateur/hobby photographers. Due to FIA safety regulations, there are now at least double fences everywhere and the most beautiful places are now difficult to access. It is therefore possible that the tips below are no longer possible.
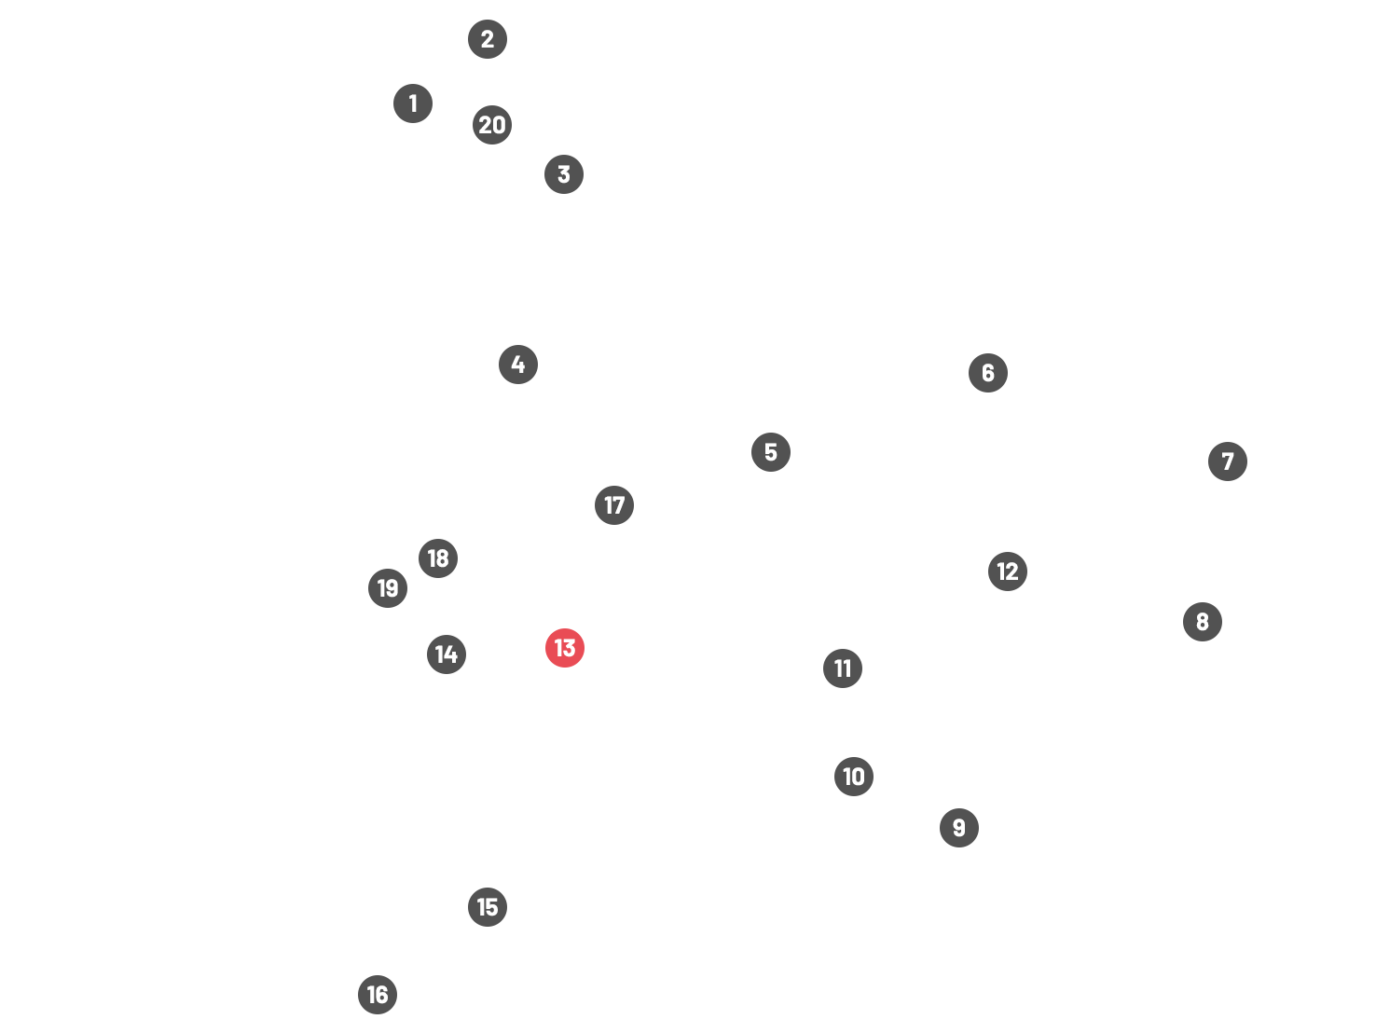
If you visit the Zandvoort circuit it is useful to make a decision whether you want to take pictures on the outside (Dunes) of the circuit, or you go for the inside (Paddock). If you choose the paddock you’ll also have the opportunity photographing the outside. My opinion is that for a little extra money it is better to take pictures with paddock access. You get closer to the circuit, most of the time you can do a pitwalk, all teams are on the infield, you can meet drivers and do have more locations for variety.
If you stand high on the end of the dune you can easily shoot over the fences. You can see the side of the car a little and certainly the back. When the DTM is racing you will probably see some flames and overtaking.
You can freeze the picture here and you can see no speed at all. 1/640 is therefore not strange setting if you only want to show the back of the car. But also panning is a possibility here for a little more action in your photos. Start here with 1/320 and customize it.
If you see a lot of sparks below and behind the cars, try 1/10 and see what happens.


A beautiful location for the start of a race is this place in the Tarzanbocht. It is often busy, so be here on time and if there is already a lot of people, and you were on time, you can always ask nicely if you may make some photos at the start.
You are here dealing with a fence, you shoot through it or you need to bring a long staircase with you. The cars coming right at you, so try as much as possible to freeze the picture.
Do not go for too much zoom, so you only have asphalt and cars, but also show some of the surroundings. Think of the pitlane and grandstand. There is also a door with a camera man most of the time in front of it. If not, you have the possibility to take pictures here as well.


If it’s up to me the most beautiful place on the outside of the track to take pictures. There is a small place after the opening where the marshals can go on the track. This place is already known by many people, so you probably need to have a little patience. You can photograph here easily over the low fence and barbed wire has been put up here so you are really free.
You can take different pictures here. With enough zoom range you can see the cars at the beginning of the bend. The best part is in the middle, where you can freeze the front shot. Or just a little part after that, where panning is a possibility for a little more action (1/320).
If you are lucky there are two cars side by side, flying a pair into the gravel. At the start of a race it’s always chaos here. Because of your low position here your pictures become even more beautiful.

You can create beautiful pictures here of the back of the car. Next to the house of the marshals is a little space on the fence. The cars come with decent speed throughout, so freezing is highly recommended. Of course you can go for a close-up here, but there’s a very small chance of success due to the speed. So go for a long shot here, and pay attention too the background. You can see the typical atmosphere of Zandvoort in your background like the dunes or the hotel.
You can also go to the other side, and if you’re tall enough take pictures over the fence and beside the barbed wire. You see the cars steering into the Gerlachbocht and touching the high kerbstones. A high change of sparks around here with the DTM.


This place looks a bit weird, and I don’t know where to stand exactly every time. If you follow the sandpath through the dunes you see the bend of the national circuit on your right side. Walk down into the grass and take a look to your left where you can see the Slotemakerbocht.
You have to shoot over a fence of middle height, and you can see the cars but can’t focus on them because of another high fence. You have to wait till they passed this, and then you have very space and time to create your photo. Probably not the best place on the circuit to take photos, but nice in case of variation.


A good point to show that you are on the circuit of Zandvoort is this point. The cars come from the Hunserug and accelerate towards the Slotemakerbocht. So look in depth to see if there are more cars driving together. You can play here with the focus / depth by the slope of the track. The cars come close to you and at a decent speed, so make sure you are fast, because a second later and they have disappeared into the Scheivlak.
Tens of meters further than spot 06 the cars going into the Scheivlak. Panning is easy because the fence is low, and if there’s some barbed wire it’s easy to photograph between it. It is still difficult to photograph the cars with their high speed, despite they brake for the bend. I recommend starting here with 1/250 and if that is easy, drop to 1/125. You can also create great speed in your photos because the bend is going down a little and there is a dune in the background with a guardrail.


This looks so easy, but still I find it hard to take a good picture here. First I tried it with my 70-200, but I was short of zoom range and the cars looks terrible at my screen. A year later I tried it with my 100-400 and still it’s not the sharp picture I want.
You see the cars on top of the Slotemakerbocht coming straight at you diving into the Scheivlak. From the top they steering into the bend and it’s going down. In my opinion the best shot is at the top, because you have the grand stand in the background and you want to show where you are.
You can use the small fence as a tripod, and you can freeze the photos here. But keep in mind, it’s no so easy as it looks like.


Take your walking shoes because this is the highest point of the circuit. The view is beautiful from here, and you can see the cars steering into the Scheivlak and accelerate to the Mastersbocht. Also you can see a part of the circuit between turn 9 and turn 10 and the straight to the Hans Ernst bocht.
There is a small part of the fence where the wire is constructed. Go to this part because you can do two things now. The first is to take photos of the cars on the kerbstones in the Scheivlak bend. If you do this, don’t freeze the picture.
The second is panning the cars on the kerbstones below you. If the sun is right, you can see the drivers perfectly and the red/white kerbstones underneath the car looks great.


If you take a look at the map, you see the small sandpath isn’t close to the circuit at this point. But there is a second path, wich isn’t on the map. If you take the lowest path there is a small place where you can see the cars coming straight at you. The picture is not super spectacular, but you can give it a try.
I do like the photos from the part I selected as point 9 at the map. There are some huge kerbstones on the inside of the mastersbocht, and almost every car is going over them. This looks amazing, and if you have enough zoom range you can take pictures here. I think you need at least 400mm at this point, but I succeed many times with 200mm.


Turn 9 (bocht 9 in Dutch) is formerly known as the Renaultbocht. At this point you go to the entrance gate for the rescue car. It’s impossible to see the cars, because of the dune at your right side, but you can hear them comming. Put your focus points as low as possible, so you can show the surroundings of Zandvoort with the dunes. Sit down as low as possible and put your camera through the gate.
Try to wait for a group of cars, and focus on the last one. You see the other cars disapear in the background for turn 10 and you have a beautiful shot. And maybe you are lucky and have a huge crash in front of you.


As with all bends, turn 9 should have an ideal line as well. However you see every driver during the race taking another line here. It happens quite often that a car is braking too late, resulting in considerable smoke and blocking tires. The part behind the fences here is easily accessible, and you can shoot over the gates as you can stand on the dunes as high as you want.
Low and just over the fence produces the best results. If you go a little bit further on the dune you can also panning the little straight for action / speed photos.
The only thing you have to keep in mind (like every corner) is the sun. But here the sun is crucial almost every time of day.


Walk from spot 11 along the fence to come to spot 12 on the map. The fence here is very low, and there is even a very large hole at the end. You can easily shoot through here, and if you’re tall it’s easy to shoot over the fence.
The background here is different for each event in terms of advertising, so your pictures will often look different. The cars come (depending on the race class) with a decent speed out of the corner. Because of a dune you see them very late.
It’s easy panning here, and a setting of 1/320 will be found soon as too slow.


Although this bend is better to photograph from the inside of the track, you can make nice pictures from the outside as well.
There is a long straight after turn 10, and most cars are at full speed before they brake here. The best line for this bend is below you, but there’s also a large fence. So you have to wait until they are in the Hans Ernst bocht and you can freeze your pictures and shoot the cars from the back.
After the Tarzanbocht you can find most of the overtake actions here. Chance of catching pictures, action photos, blocking wheels, collisions and into the gravel is always a possibility here.


Do not walk into the dunes, but keep walking down along the fence until you almost at the track. The fence is low, and you can easily go with your lens between the barbed wire. The best spot is probably at the gate for the marshalls, but you have to keep this free. So just next to it, and use a dirt container where you can climb on.
The cars come from the Hans Ernst bocht (formerly Audi S), and are not at full speed. You can easily try panning (1/320) and you get them diagonally from the front in your photos. For the larger events, there is a stand on the inside of the circuit. This stand with people gives a nice atmosphere to your pictures!


It is very difficult at this point to make beautiful pictures. The only thing you can do here is shooting the cars from the rear when they fully drive over the kerbstones. The colors of the kerbs make sure that your photos are still worth watching. If you turn the picture a bit it seems like you are being drawn into the picture.
Do not freeze your photos, but still use a setting like 1/320 or something like that. It’s not only the back of the car, but also a part of the side that you will see. And it looks weird if the tires are frozen.


This is a perfect overview shot, with the grand stand and the control tower in the background. Put your focus points as low as possible. You see the cars leaving the Hans Ernst bocht and accelerate on the straight to the Kumhobocht. In the first rounds when the field is together you have a lot of cars.
You have to wait until the first car is almost at the Kumhobocht. Freeze the picture because it’s hard to see the tires. If you do it right, this picture really shows your at the circuit of Zandvoort.


Making a beautiful atmospheric photo full of speed you do in this place. You see the cars very late, so some experience with panning is certainly useful. Take the car in your viewfinder with the grand stand in the background and you have a very nice picture. A few meters later you have high advertising signs in the background. Some people find this annoying, I however, think they have something (if not blue taped) special. These billboards give color to your photo, and can help you create speed in your photos. It should certainly be possible to use 1/60 as a setting.
Walk a few steps to the other side of spot 19, and you have the straight before braking of the Hans Ernst bocht. From the inside you have absolutely no problems with the low fence, and you have all the space panning your shots. During the DTM you see large flames behind and beside the car when they are downshifting, which is always good to have on the picture.


In most cases, the advertising signs are not present on the inside of the Hans Ernst bocht. The only thing you encounter is a fence with some big holes that easily fit through a lens. The cars are really a few meters along and through the low position it seems like you’re very close to them.
Also there’s always something going on in the Hans Ernst bocht. Tires coming of the ground by violently driving over the kerbstones or someone disappears in the gravel. Do not freeze your photos, start with 1/400 here and if you succeed try lower shutter speed.


This is one of my favorite places on the circuit of Zandvoort. Especially with an event like the DTM. The cars accelerate to the Kumhobocht, and driving wide on to the kerbstones. The big red white areas with a car on it and some dust on the side makes this a spectacular place.
There must be something wrong with this place. Actually no, it is rare that I do not make nice pictures here. The only problem can be marshalls waving flags and stand in front of you.
I always take two different shots here, the first is a zoom shot of the cars on the kerbstones, the second is an overview shot with the Kumhobocht in the background.


Here you can enjoy panning the cars, but you probably suffer from the fence. There is usually a trailer here, use this as a staircase to photograph above the fence. Start here with 1/320 and see whether you have mastered it. If this setting is not a problem, you can always lower your shutter speed.
But there can also be a problem here. With the larger events this area is also the place for a restaurant or merchandise shops. There is no trailer and it’s almost impossible to take good photos here.


Want more information about a circuit or have a tip of your own? Let me know!
Contact me